Anebula is reader-supported. When you buy through links on our site, we may earn an affiliate commission.
2025 Update:
The Omada + pfSense system is still kicking and has been rock solid for over three years! I have added a new core switch TP-Link Omada SG3428XPP-M2 since I was running out of ports and also wanted 10Gbe speeds. I also added a Mikrotik CRS310-8G+2S+IN switch for the office room so that my desktop could get 10Gbe. Omada has been incredibly reliable and adding/removing switches or VLANs is ridiculously easy. Omada is also 100% local with no registration required.
See my latest Omada setup on this post: TP-Link Omada SG3428XPP-M2 Power Consumption and Testing
2024 Update:
It’s been two years and five months since I upgraded to TP-LInk Omada and pfSense. During that time, I expanded the network with an additional switch and added many more clients. Outside of regular maintenance, I have not made major changes since the original setup. Also, there has not been a single outage, bug, or anything unexpected with the system during this time, which is not something I could have said about the old R7000 router. The pfSense firewall, Omada switches, and Omada access points run on a UPS and are online 24/7 for months at a time. I try to go in every two months to power cycle all the components and run updates, but I’m sure even if I didn’t do that, the network would stay online.
Timeline
January 2022 – Purchased and set up the TP-Link Omada and pfSense system. Also, set up some VLANS and basic firewall rules.
July 2022 – Purchase an additional Omada switch (TL-SG2008P) and also purchased a 4MP camera (EmpireTech Dahua IPC-T5442T-ZE)
September 2022 – Added an outdoor 4K camera (REOLINK RLC-811A).
October 2022—Set up network-wide ad blocking with pfBlockerNG. This package is available within pfSense and can be enabled with a few clicks.
November 2022 – Added a 4MP indoor camera (EmpireTech Dahua IPC-K42A).
August 2023 – I’m thinking of upgrading to a TP-Link Omada 24-port PoE with SFP+ switch (TL-SG3428XMP)
July 2024 – No hardware updates, only regular software updates since last year
March 2025 – Purchased a TP-Link Omada SG3428XPP-M2 and Mikrotik CRS310-8G+2S+IN.
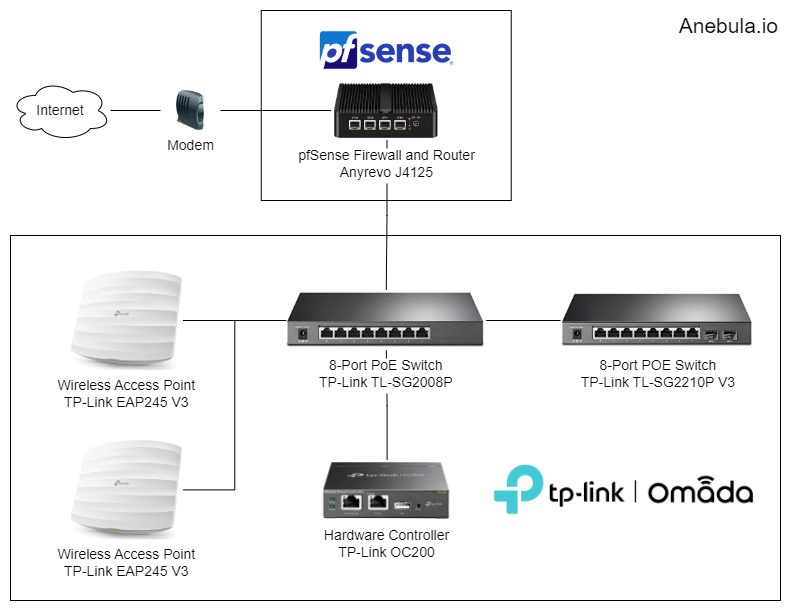
How do pfSense and TP-Link Omada work together?
I had this question myself, and the short answer is “harmoniously” because both pfSense and Omada follow the same standards. Think of it as how USB has become a standard, so you could take one of the million USB devices out there and connect it to a PC, and the PC knows how to communicate with it—this is exactly what pfSense and Omada are doing. Omada and pfSense are just following the same standards at the protocol level.
What you do is you set up pfSense then you set up TP-link Omada separately, then you connect them and they talk to each other!
pfSense’s role
- Communicate with the modem via WAN or “upstream port”
- Block unwanted WAN traffic from entering your LAN or “private network”
- Assign IP addresses to clients in your network – this is known as the “DHCP Server” in pfSense
- Let you manage your interfaces with firewall rules. i.e., LAN can talk to camera VLAN, but camera VLAN cannot initiate communication
TP-Link Omada’s role
Think of Omada switches, wireless access points, and the controller as extensions of pfSense. For example, if you need WiFi, get wireless access points. Or if you need more ports, get a switch.
- The switches give you more ports so that you can physically connect via CAT6 and even power PoE cameras
- The switches also let you tag traffic with VLANs. For example, anything that gets plugged into port 1 will be tagged as VLAN 50.
- The wireless access points provide WiFi. This means that you can easily upgrade to WiFi 6 just by swapping APs
- The controller gives you a single interface so that you can make your changes once and have them propagate to all devices. For example, with the controller, you can change your WiFi guest network password once, and it will propagate to all your access points (AP), while without a controller, you would have to go into each AP and update the WiFi password there.
- The controller also helps with AP roaming so that as you walk through your house or office, your device can switch to the closest AP.
What happens between pfSense and Omada is all standardized. This means that you could even swap pfSense for OPNsense or swap Omada with Unify/Ruckus, and everything would still work fine. This separation means that they can both do their jobs and not worry about how the other component is making things happen. For example, pfSense doesn’t care or even needs to know if a client is wired in or on WiFi because the Omada access point takes care of the WiFi and authentication and then passes only the info that is required to pfSense (MAC address, hostname, etc).
On the flip side, the Omada access points and switches just pass traffic through to pfSense and let pfSense decide what is valid or invalid. Based on its rules, pfSense decides whether traffic is allowed to travel between VLANS or to the Internet.
Why pfSense over a TP-Link Omada router?
For me, it came down to the following areas:
- VPN Support: I really wanted to use WireGuard over OpenVPN because the speed is greatly improved. Speed is particularly important for streaming all my camera feeds to multiple devices outside the network.
- Ad Blocking: I wanted a firewall/router with built-in ad-blocking capabilities. In the past, I have used Pi-hole in a VM, but I really wanted to consolidate this feature into the firewall for easier maintenance.
- Hardware Performance: I wanted a firewall with enough CPU/RAM power for ad-blocking and packed inspection (I didn’t end up using this), and the pfSense firewall appealed more here since you can use any processor and RAM combination that suits your needs.
- NTP Server: pfSense makes it easy to be the “central clock” for your entire network. Having all devices on the same NTP server means easier log tracing.
Experience Level Required
Before this setup, I used a Netgear R7000 Nighthawk router and had never set up anything with independent components like you have with an Omada + pfSense network. Most of my knowledge of setting up Omada and pfSense came from YouTube videos like this. While it’s not as easy as setting up a consumer-grade router, much of the setup is pretty intuitive. Also, there are friendly communities such as the r/pfsense or r/homelab on Reddit where you can post your questions.
As a side note, I do not work in IT. I’m simply a curious individual who likes to explore rabbit holes and try out cool tech.
Blueiris + Omada + pfSense
The Omada and pfSense network supports 9 cameras, some of which record 24/7. The camera bandwidth load is 3.8 MB/s at any given time but can spike up to about 5.0 MB/s. All cameras are wired in via CAT6 to Omada switches on PoE ports.

The cameras run on VLAN 50, which means that their traffic is completely isolated. They can’t go out to the internet or “phone home” because they don’t get internet access in their VLAN—I block all traffic via pfSense firewall rules. The only things that the cameras can communicate with are pfSense for DHCP assignment and the pfSense NTP server so that their time is in sync with my network.
Separately, the Unraid Windows 11 VM has two network interfaces: one interface is tagged with VLAN 50 for camera access, and the other interface is tagged with VLAN 40 for Blue Iris admin access and for accessing the UI3 web interface.
pfSense Interfaces
Interfaces are how pfSense defines network traffic segments. These can be physical interfaces or virtual interfaces. Here is how I have mine set up:
| Interface | Type | Description |
|---|---|---|
| WAN | Physical (mapped directly to a port) | pfSense creates this by default. This is the upstream port and is where you connect your modem. |
| LAN | Physical (mapped directly to a port) | This is a custom virtual LAN, or “VLAN,” where I put my trusted devices, such as my laptop and desktop. |
| VL20TRUSTED | Virtual, connected to LAN interface | This is a custom virtual LAN, or “VLAN,” where I put my untrusted devices, such as IoT devices. |
| VL30IOT | Virtual, connected to LAN interface | This is a custom virtual LAN or “VLAN” and is where I put my untrusted devices like IoT devices. |
| VL40SERVER | Virtual, connected to LAN interface | This is a custom virtual LAN or “VLAN” and is where I put my servers. |
| VL50CAMERA | Virtual, connected to LAN interface | This is a custom virtual LAN or “VLAN” and is where I put my IP cameras and Blue Iris Windows 11 machine. |
| WIREGUARD_VPN | Virtual, connected to LAN interface | This is created and managed by the WireGuard built-in VPN in pfSense. Here’s a video on how to set up WireGuard. |
Please note that while the pfSense firewall has 4 ports, I’m only using 2, which are WAN and LAN—this is a typical setup. You could use one of the other ports as a backup WAN, say, for example, if you had two internet connections and wanted to set one up as a backup. You can also use a port to create a separate subnet if you want even more separation.
pfSense and Omada Hardware Recommendation
If you want to set up a pfSense and Omada network, here is what I would recommend.
pfSense Firewall Options
| Product | Budget | Highlights |
|---|---|---|
| Protectli Vault FW4C | High | 2.4G, Intel J3710, 8GB RAM, reputable brand, no OS preinstalled (install video) |
| HUNSN RS34g | Medium | 2.4G, Intel J4125, 8GB RAM, Comes with OPNsense preinstalled so you’ll need to install pfSense OS (install video) |
| Anyrevo N5095 | Low | 2.4G, Intel 11th Gen N5095, 8GB RAM, comes direct from China, I have an older one of these and it took about 9 business days to receive, comes with pfSense preinstalled. |
Omada PoE Switches
I recommend planning how many ports you need and then doubling or tripling your figure because clients multiply like rabbits.
| Product | Budget | Highlights |
|---|---|---|
| TL-SG3428XMP | High | 24-Port PoE+, 4-Port SFP+ |
| TL-SG3428MP V2 | Medium | 24-Port PoE+, 4-Port SFP |
| TL-SG2210MP V3 | Low | 8-Port PoE+, 2-Port SFP |
Omada Wireless Access Points
| Product | Budget | Highlights |
|---|---|---|
| EAP660 HD | High | WiFi 6 AX5400 2.5G |
| EAP650 Ultra-Slim | Medium | WiFi 6 AX3000 1G |
| EAP613 Ultra Slim | Low | WiFi 6 AX1800 1G |
Omada Controller
The difference between the two controller options is the devices that they can support. A device is considered something like a switch or access point.
CAT6 Cables
For data only, you can pretty much take any quality CAT6 and be fine. However, for PoE, look for “pure bare copper” when you buy CAT6, as this will handle PoE and, of course, non-PoE. My go-to choice is the Monoprice Flexboot Cat6 Ethernet Patch Cable. Please note: there is no official “PoE cable” or standard. The factor in determining PoE support is the wire inside; hence, look for “pure bare copper.”
Thank you for making it to the end! Any questions?
I stumbled across this page as I’m struggling setting up VLANS on my Switch. Using pretty much the same layout as you. PFSense on Protectli (Easy to set up), SG2210P. Just opting for the browser GUI to configure.
Can you send me your “generic” switch configs?
Say Port 1 is your trunk LAN. Port 2 is VL20TRUSTED, and Port 3 is VL30IOT.
I use pfsense + omada SDN for my network.
Configure the uplink port to TP-Link switch on pfsense as trunk port for vlan1, and tagged: vlan20 and vlan30. Note: firewall rules, interfaces, and DHCP servers also need to be configured.
1. Configure TP-Link switch port 1 as the uplink trunk port.
2. Configure TP-Link switch port 2 as untagged for vlan20.
3. Configure TP-Link switch port 3 as untagged for vlan30.
I used profiles to configure the ports where tagged and untagged settings are based on the profile. APs are using a profile called All as a trunk port. IoT is using a profile called IoT where the profile is set for untagged vlan30. Another profile might be Trusted or Guest with an associated untagged vlan.
I have very similar gear and would like a similar setup. However, it seems that my EAP650 and EAP655 can only utilize 1 VLAN per SSID, since I am not using an Omada gateway.
I’d prefer to use a single SSID on my APs but still have multiple VLANs. How does your EAP handle multiple VLANs? i.e. can your IOT devices and trusted devices utilize the same AP and SSID?
Or are you running multiple SSIDs on your APs?
I made some updates since my post put this is the current setup:
I have two wireless networks:
SSID1=”Wifi-20-Trusted” and SSID2=”Wifi-30-IOT”.
Both wireless networks are broadcasted out of all my access points, in my case I’m still using two EAP-245 access points. However, each SSID is only associated with one VLAN each.
Regarding “it seems that my EAP650 and EAP655 can only utilize 1 VLAN per SSID”, as I look through Omada right I’m also limited to 1:1 between SSID and VLAN. Come to think about, I don’t think I’ve ever seen mutliple VLANs for one SSID.
I did see this post on reddit which suggests that the feature that you are looking for is possible.
https://www.reddit.com/r/TPLink_Omada/comments/war94n/can_an_eap610_run_multiple_vlans_on_one_ssid/
The only way I have every used vlans with wifi is to have separate SSID’s for each vlan, as you have described, SSID: “Trusted”, SSID: “IoT”, and SSID: “Guest” would all be separate vlans with special network access rules configured in the pfsense firewall router.
It would of been helpful to post the configuration for the Omada Vlans, Profiles, and how you manged the ports whit those vlans. any ACL ?.
And a VLan configuration whit Opnsense to Omada Network.
This wont be clear to any one new just starting out, that knows nothing about networking and is trying to learn.
Just a though great post thought thank for sharing. /cheers