
Anebula is reader-supported. When you buy through links on our site, we may earn an affiliate commission.
Have you ever wanted to start a blog? or to have your own website? or to host your own photos cloud? This series will show you how to do all that plus more. I’ve been hosting services like this since 2014 and have learned alot – I’ve made a lot of mistakes along the way and have re-done my stack multiple times to come up with the best balance. More specifically, the solution in the series is for budget-conscious individuals and small companies who have some time to spare and want to have a deep level of understanding and control in what they are hosting and how they are hosting it. To stay focused we will be aligning with the following goals.
Affordability – This is key for an individual or a small business. This will mainly be dictated by the size of the virtual machine (VM) that you choose. It can be as low as $5/mo or as high as you want to spend. I will make recommendations when we are in the VM section.
Reliability – We are going for a budget-friendly yet reliable solution. We will be using tried and true technology from vendors that I have used for many years.
Security – The stack should be secure and up-to-date so that we don’t get uninvited guests.
Expandability – the stack should be able to grow if we want to add another WordPress instance or any other service.
Now let’s get into the high-level architecture.
The Architecture
At a high-level, our server will sit behind Cloudflare proxy so that we get anonymity, DDOS protection, advanced firewall protection, and caching – this means that our origin server will have to work less and more importantly, our customer or site vistors will have a snappy experience.
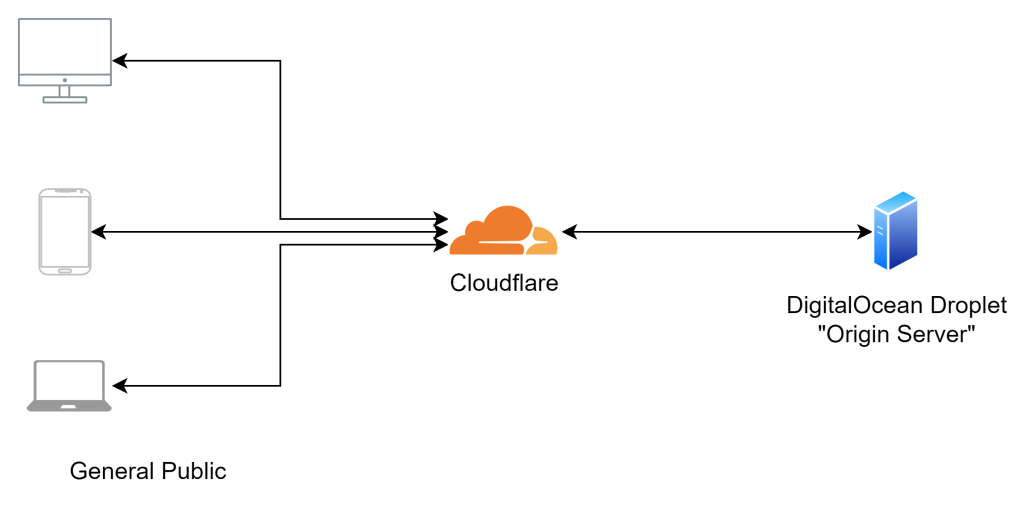
How does it work? A site visitor will only see the Cloudflare IP address and will not be able to see or reach our actual origin server. Only Cloudflare will know about our origin server and only Cloudflare can make requests to it. Cloudflare will cache content that is static but will be ready to fetch dynamic content from our origin server. Does that sound complicated? Don’t worry, it sounds more complicated than it actually is.
The Stack

The stack is centered around Docker, a technology that lets us mix and match different services with different dependencies on the same host without any conflicts. Additionally, with Docker, we can perform maintenance on specific services without affecting adjacent containerized apps. Each service runs in an isolated container which means that all apps are logically separated.
In a real-world environment, you could have 3+ different websites running on the same machine without conflicts. For example:
Container 1 > WordPress > AnimalSiteXYZ.com
Container 2 > WordPress > PersonalBlogVXQ.com
Container 3 > Nextcloud > Nextcloud.BuellerFamilyVYT.com
Container 4 > another WordPress site
Container 5 > another WordPress site
The possibilities are endless here. You can add as many services as you want to go to whichever domain or subdomain you wish. In the docker tutorial, I will show you how to monitor CPU and memory usage to gauge if you need to upgrade your Droplet.
Another cool thing with Docker is that your site visitors would never know that you are running completely different services from the same machine. This means you can mix and match whatever you want to run on the VM.
The Services
This series will cover setting up the following four services: WordPress, Netxcloud, Matomo, and Ghost. I have used all of these in a production environment and can tell you firsthand that they are reliable and trusted products. Beware that all of the services listed above have paid alternatives. However, we will be using the free/community versions which work just fine.
Now let’s focus on NGINX Reverse Proxy – this containerized service will take requests and forward them to the right app. For example, NGINX Reverse Proxy will forward PersonalBlogVXQ.com requests to the WordPress instance and the other requests to the other services. We will set NGINX Reverse Proxy using NGINX Proxy Manager, a GUI on top of the reverse proxy.
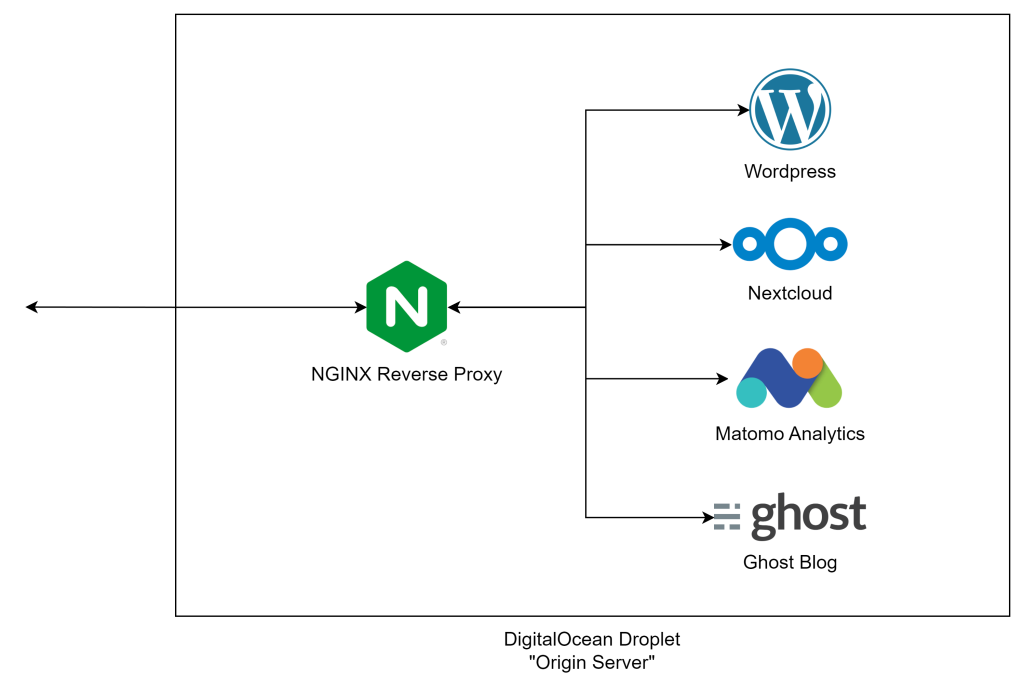
To recap here are the services we’ll be running:
NGINX Proxy Manager (NPM) – this will route requests to the right container depending on the request URL. NPM controls NGINX Reverse Proxy underneath.
WordPress – an open-source blogging platform. The most popular blogging platform in the world.
Nextcloud – an open-source personal cloud. Think of it like Dropbox, Box, Google Docs/Sheets/Drive.
Matomo – an open-source product and marketing analytics platform. Think of it like Google Analytics or Adobe Analytics.
Ghost – an open-source blogging platform.
Like the idea? Continue to the next part in the series – Buying a domain on Namecheap