Anebula is reader-supported. When you buy through links on our site, we may earn an affiliate commission.
This guide is part of the How to host multiple sites on one virtual machine with Docker series, where you learn how to create one virtual machine (VM) to host multiple websites and apps. In this series, we will host a WordPress blog, a Ghost blog, a Matamo Analytics app, and much more!
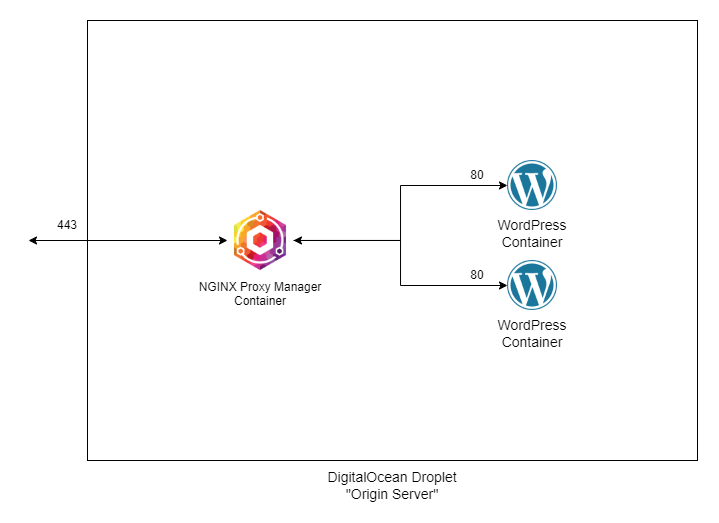
Up to this point, we have set up the foundation for a scalable multi-services VM. That means that we start spinning up sites with ease.
Step 1: Create a new DNS entry in Cloudflare
This assumes that you already have your domain set up as covered in Part 2: How to set up a site with Cloudflare DNS.
To make things a little interesting, I’m going to set up two WordPress blogs:
https://sympatheticdisk.info/
https://blog.sympatheticdisk.info/
Let’s start by going into Cloudflare and adding both entries:
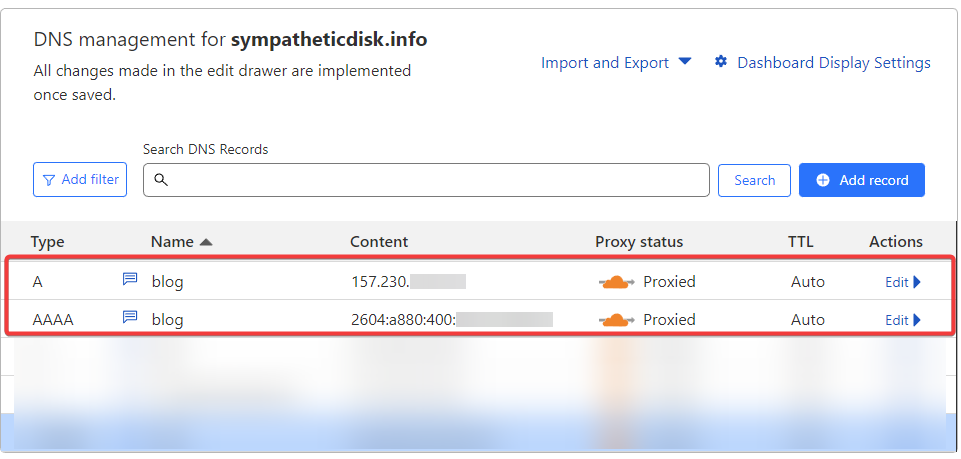
Blog on subdomain
Add a Type=A entry that points to your Digital Ocean VM IPv4. Then add a second Type=AAAA entry that points to your VM IPv6 (this can be found on the Droplet page in Digital Ocean). The “name” on both entries is the subdomain that you want to use. For example, I want to use “blog” so that the full URL is https://blog.sympatheticdisk.info/.
We want to use IPv6 since this is the future, and eventually, all sites will be required to use IPv6. When we set up both IPv4 and IPV6, a user trying to access your site would first try IPv6 if it is available but will fall back to IPv4 if needed – this is a standard way to handle both protocols.
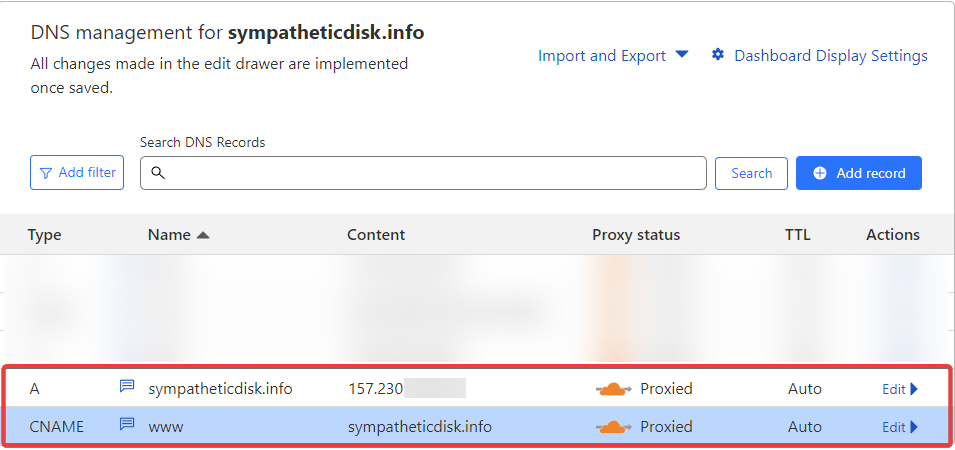
Blog on root domain
Add a Type=A entry that points to your Digital Ocean VM IPv4 and set the name to “@”; this will tell Cloudflare to point your root domain to the VM. Then add a second Type=CNAME entry where www points to your root domain.
By having both entries, we can capture traffic that adds or omits “www” to the URL. Cloudflare will redirect “www” to the root domain – this is a standard way to cover both bases.
That’s all we need to do in Cloudflare; now we can pivot to VSC.
Step 2: Set up WordPress via Docker Compose
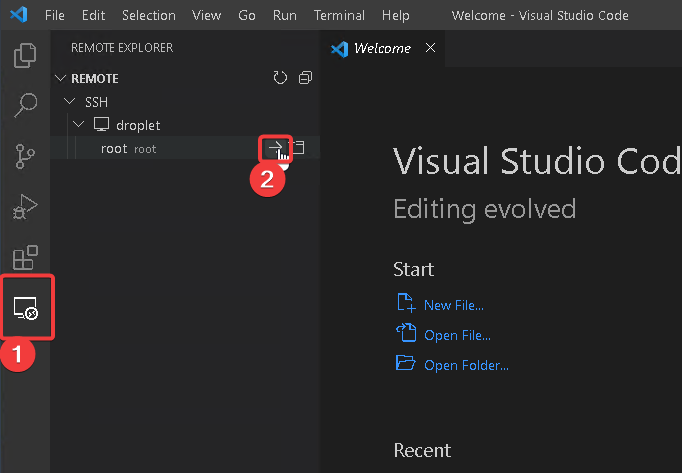
SSH into your VM. Follow the steps from Part 4: How to connect a Virtual Machine to Visual Studio Code to SSH in. Alternatively, here is a quick summary – Open VSC > Remote Explorer > Connect. Then, enter your SSH key passphrase.
Once you are connected to the VM, go into your existing project and create two folders: “blog-root-domain” and “blog-root-domain”, then create a new docker-compose.yml in each folder.
Contents of ~/docker-stack/blog-subdomain/docker-compose.yml
version: "3.1"

services:
  blog-subdomain:
    image: wordpress
    restart: unless-stopped
    expose:
      - '80'
    environment:
      WORDPRESS_DB_HOST: db
      WORDPRESS_DB_USER: wordpress
      WORDPRESS_DB_PASSWORD: password1
      WORDPRESS_DB_NAME: wordpress
    volumes:
      - wordpress:/var/www/html
    networks:
      - nginx-proxy
      - backend

  db:
    image: mysql:5.7
    restart: unless-stopped
    environment:
      MYSQL_DATABASE: wordpress
      MYSQL_USER: wordpress
      MYSQL_PASSWORD: password1
      MYSQL_RANDOM_ROOT_PASSWORD: '1'
    volumes:
      - db:/var/lib/mysql
    networks:
      - backend

volumes:
  wordpress:
  db:


networks:
  nginx-proxy:
    name: nginx-proxy
    external: true
  backend:
    external: false
Contents of ~/docker-stack/blog-root-domain/docker-compose.yml
The only difference between the WordPress (WP) instance for the subdomain and WP instance for the root domain is the service name (line 4).
version: "3.1"

services:
  blog-root-domain:
    image: wordpress
    restart: unless-stopped
    expose:
      - '80'
    environment:
      WORDPRESS_DB_HOST: db
      WORDPRESS_DB_USER: wordpress
      WORDPRESS_DB_PASSWORD: password2
      WORDPRESS_DB_NAME: wordpress
    volumes:
      - wordpress:/var/www/html
    networks:
      - nginx-proxy
      - backend

  db:
    image: mysql:5.7
    restart: unless-stopped
    environment:
      MYSQL_DATABASE: wordpress
      MYSQL_USER: wordpress
      MYSQL_PASSWORD: password2
      MYSQL_RANDOM_ROOT_PASSWORD: '1'
    volumes:
      - db:/var/lib/mysql
    networks:
      - backend

volumes:
  wordpress:
  db:


networks:
  nginx-proxy:
    name: nginx-proxy
    external: true
  backend:
    external: false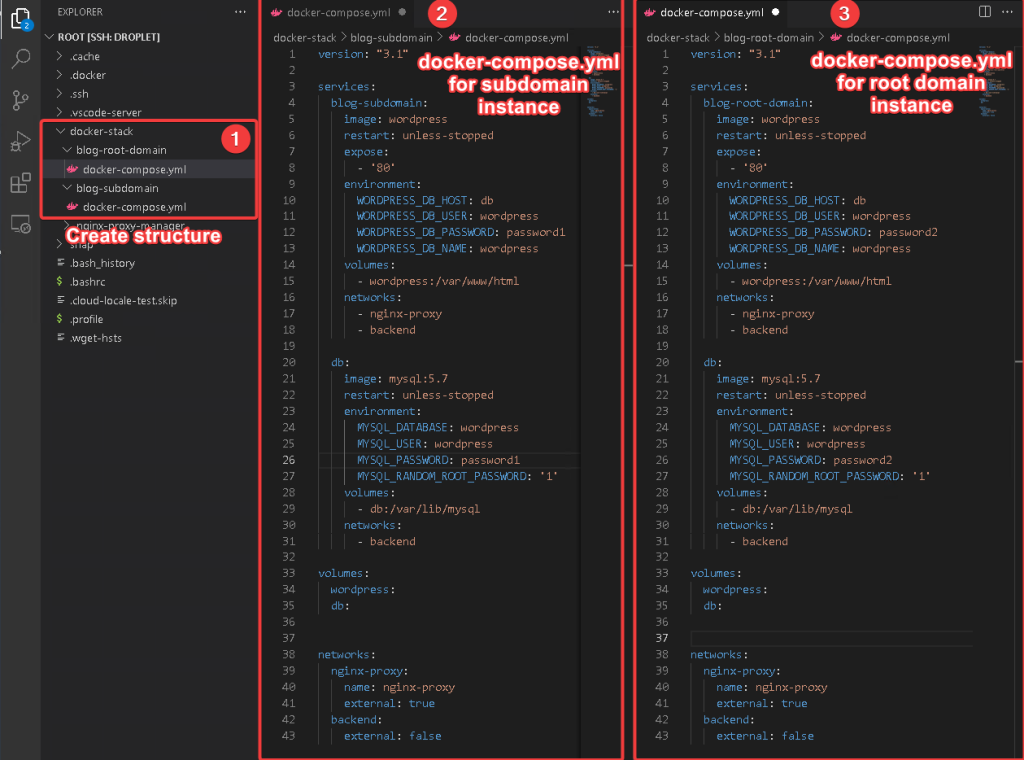
Next, go into each docker-compose and change the database name, database password, and database username to something unique and difficult to guess.
Tip: Special characters in the docker-compose.yml sometimes cause issues. I recommend a very long letter and number combo.
Tip: You can increase security by using environment variables and referencing the file in docker-compose.yml (not covered in this post)
Now open up the terminal and bring up each Docker compose stack.
docker compose up -d

Now, Docker is fully set up. However, the sites are not reachable at this point since nothing is forwarding traffic to port 80. We can fix this with NGINX Proxy Manager…
Step 3: Set up NPM Host
The final step is to go into NPM and create new entries to proxy traffic to your docker containers.
Navigate to your NPM instance. For me, it is https://npm.sympatheticdisk.info/ as we set up in Part 5: How to set up NGINX Proxy Manager using Docker Compose.
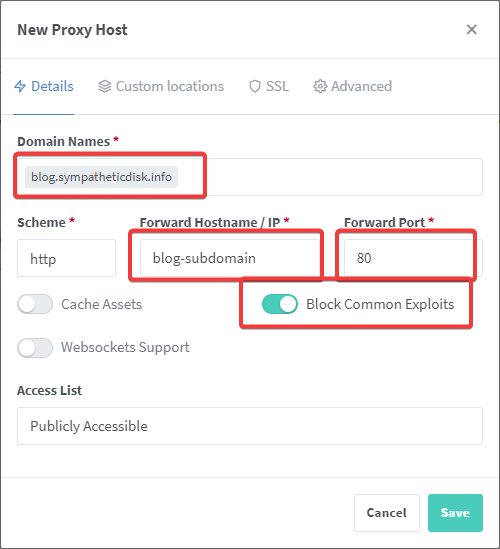
In NPM, click on Proxy Hosts and Add Proxy Host.
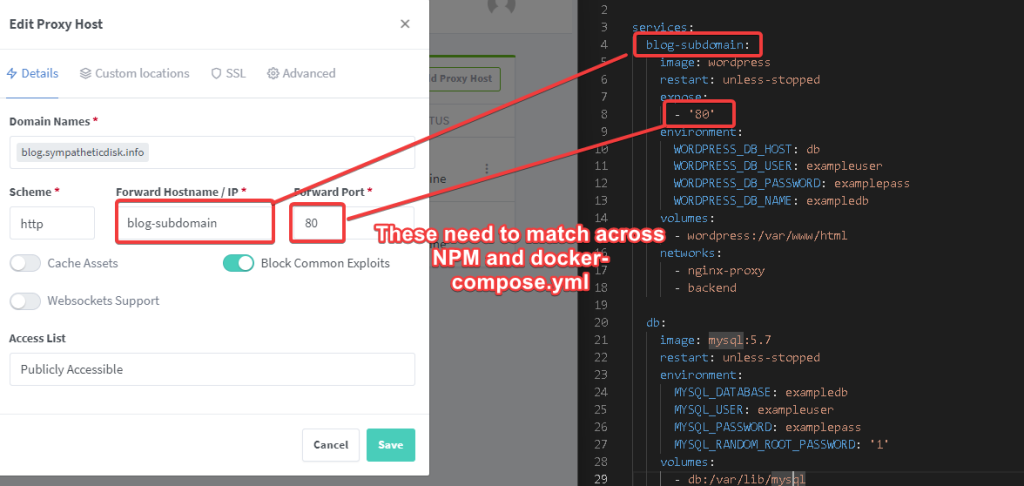
Enter your subdomain as shown below – this is also what we set up in Cloudflare. Forward Hostname and Forward Port need to match what you have in docker-compose.yml.
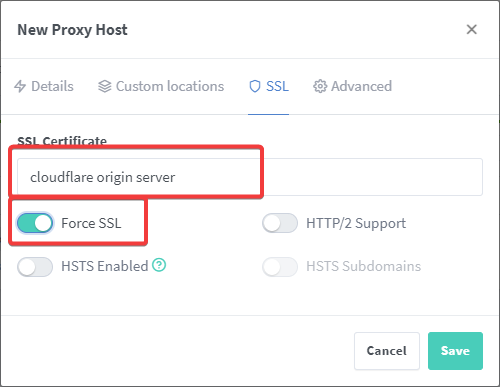
Click on the SSL tab, then select your Cloudflare origin certificate and enable Force SSL
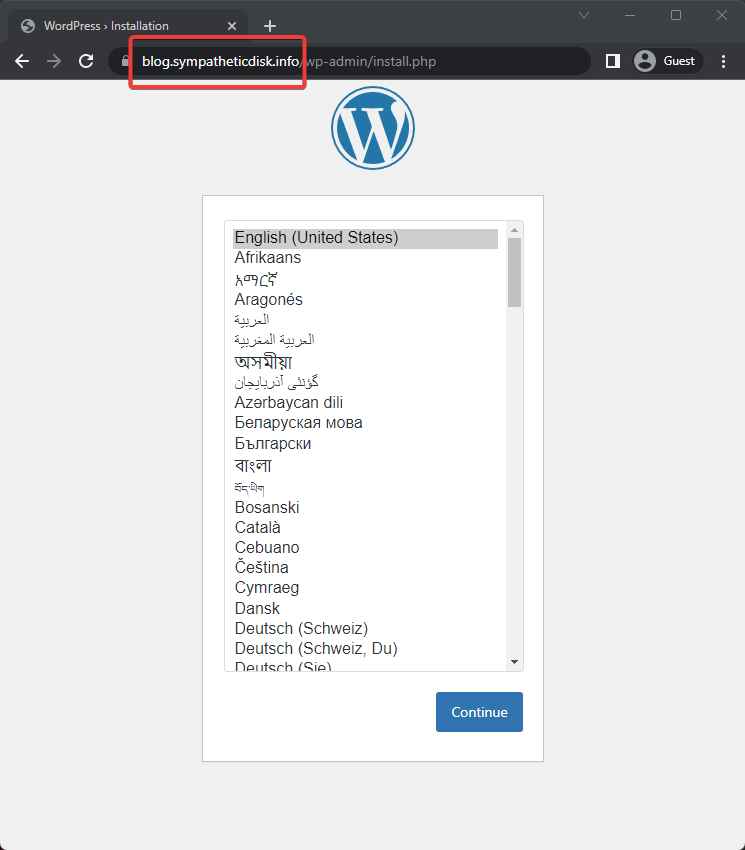
Then hit save and go to your subdomain and you should have a new WP instance ready to start blogging!
A key note here is that NPM “Forward Hostname” and the docker-compose “service name” should match. What this is effectively saying is that NPM will proxy traffic that is looking for blog.sympatheticdisk.info to a host named blog-subdomain, on port 80. For this to work, both NPM and the WP instance need to be on the same “nginx-proxy” Docker network, which is exactly how we set it up.
The steps to set up the blog on the root domain are the same, with the exception of the NPM Domain Names, where you’ll need to enter the root domain without a subdomain, such as “sympatheticdisk.info”.
That’s it. If you’ve been following along, you should have two WordPress instances running on one VM.
To summarize, this is what we’ve accomplished:
- You have two WordPress sites – one that is on a subdomain and one that is a root domain
- Your site is served securely via HTTPS
- www redirects to the root domain