Anebula is reader-supported. When you buy through links on our site, we may earn an affiliate commission.
This guide is part of the How to host multiple sites on one virtual machine with Docker series where you learn how to create a virtual machine (VM) to host multiple websites and apps. In this series, we will host a WordPress blog, a Ghost blog, a Matamo Analytics app, and much more!
Up to this point, we have purchased a domain and set up the domain with Cloudflare DNS, we created a VM on Digital Ocean, then we connected to that VM using Visual Studio Code. Now it is time to set up NGINX Proxy Manager via Docker.
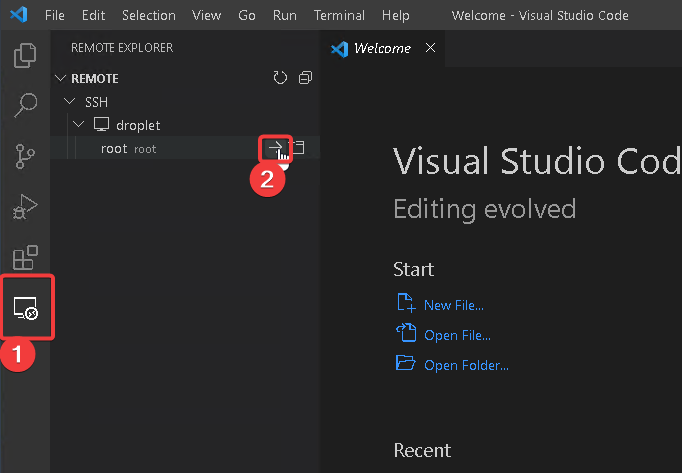
Step 1: SSH into your Virtual Machine
Before we can set up NGINX Proxy Manager, we need to SSH into our machine. Follow the steps from the previous post to SSH in. Alternatively, here is a quick summary – Open VSC > Remote Explorer > Connect. Then enter your SSH key passphrase.
Step 2: Create a Docker network
We need to create a Docker network so that multiple Docker Compose instances can see the proxy.
In VSC, open up the terminal by going to Terminal > New Terminal, then enter the following command.
docker network create nginx-proxy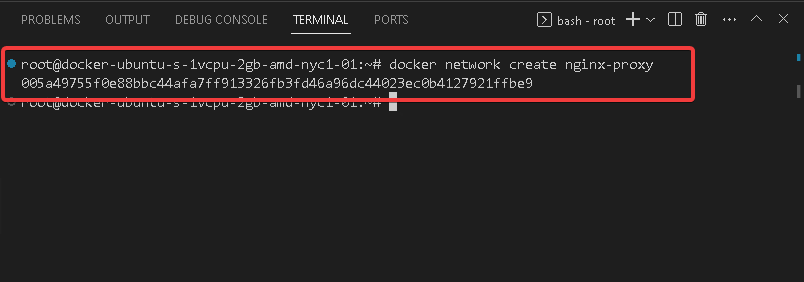
This will create a new network called nginx-proxy. Once it’s created you won’t need to come back and edit it in any way.
Step 3: Set up NGINX Proxy Manager
This step will walk you through getting NGINX Proxy Manager up and running and available on the world wide web.
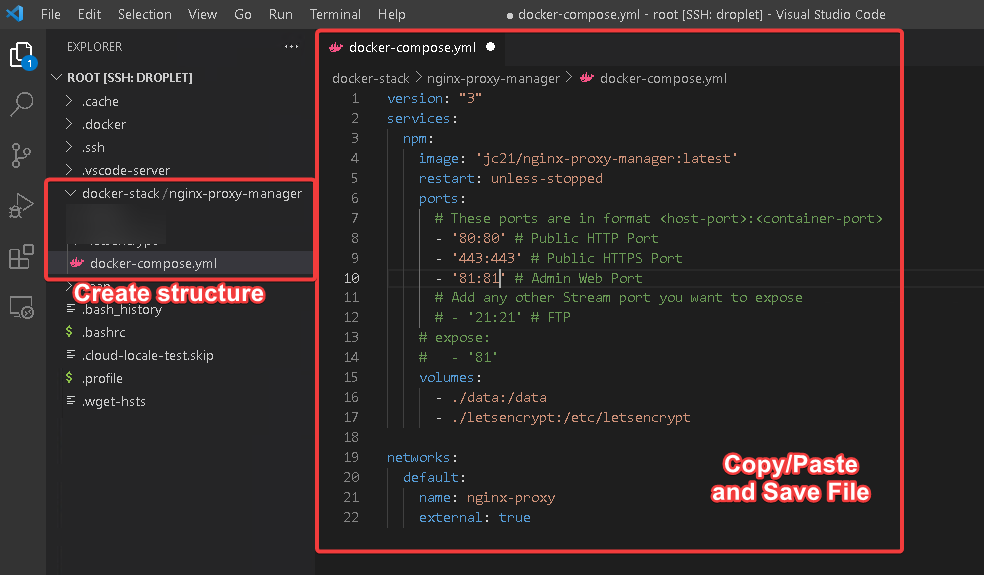
In the /root directory, create a new folder “docker-stack” with a sub-folder “nginx-proxy-manager”. Ex:
/root/docker-stack/nginx-proxy-managerThen in the nginx-proxy-manager folder, create a file called docker-compose.yml and paste in the following.
version: "3"
services:
  npm:
    image: 'jc21/nginx-proxy-manager:latest'
    restart: unless-stopped
    ports:
      # These ports are in format <host-port>:<container-port>
      - '80:80' # Public HTTP Port
      - '443:443' # Public HTTPS Port
      - '81:81' # Admin Web Port
      # Add any other Stream port you want to expose
      # - '21:21' # FTP
    # expose:
    #   - '81'
    volumes:
      - ./data:/data
      - ./letsencrypt:/etc/letsencrypt

networks:
  default:
    name: nginx-proxy
    external: true
The docker-compose.yml file contains information on how to start and configure a docker container.
| Property | Description |
|---|---|
| services | A list of docker apps to run, every item here will use an image to create a container. In the example above, we are calling the first app “npm”. |
| image | The source image from where to build and start the container from. We are using the official jc21/nginx-proxy-manager repository here. You can read more about it here. |
| restart | If the container ever fails or crashes, we are telling Docker to restart always, unless we manually stop it first. |
| ports | This container port mapping from the host VM to the Docker container. The format is [host port]:[container port] ’80:80′ # Public HTTP Port ‘443:443’ # Public HTTPS Port ’81:81′ # Admin Web Port |
| expose | This will be enabled in the last step so that only NPM can access its own admin port |
| volumes | Docker containers when they are running are ephemeral, which means once stopped all data is lost (no persistence). We map a volume from the host to the container so that our settings and data are saved even when we stop the container. |
| networks | This tells Docker Compose to use the nginx-proxy network as the default network for all apps in this docker-compose.yml. This will make more sense when we add the first blog instance. |
Now in the terminal navigate to the project folder and start up the container.
cd docker-stack/nginx-proxy-manager
docker compose up -d
This will take a minute the first time you run it since it needs to download the image, once ready it will start your container and you’ll have NPM running.
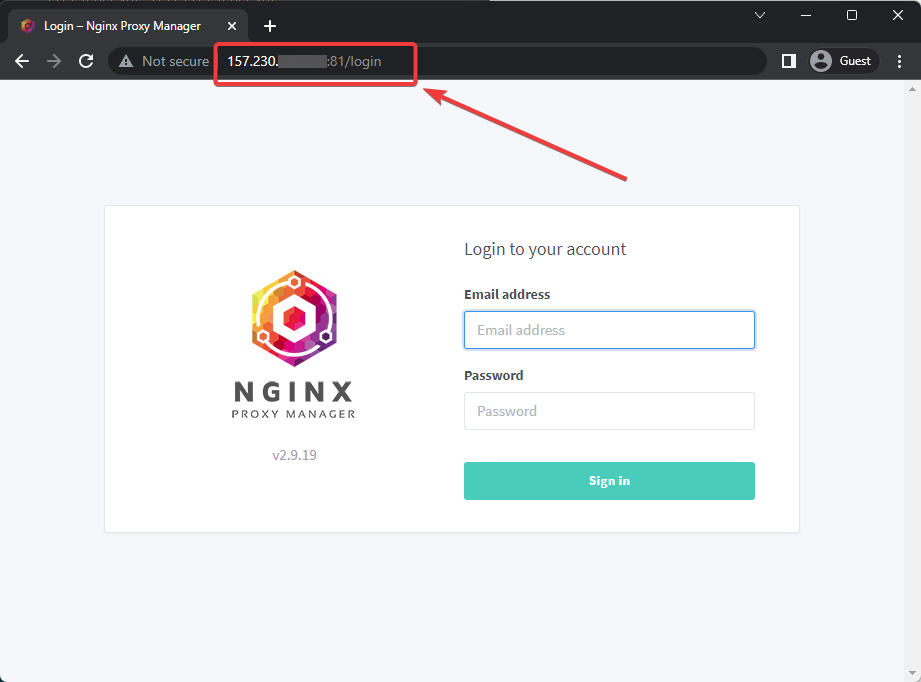
Now we can access NPM from a browser. Go to your IP address and port 81.
Ex: 157.230.xxx.xxx:81/login
Use the IP for your own virtual machine.
Now enter the default username and password:
Email:    [email protected]
Password: changeme
Fill out the next form with your full name, nickname, and email address.
Then create a good strong password.
Step 4: Add Cloudflare Origin Server Key
Log into Cloudflare, click on the website that you set up in Part 2: How to set up a site with Cloudflare DNS, then on the main menu click on SSL > Origin Server
Then Create Certificate, leave everything as default then click Create
Now copy the certificate and private keys into a notepad and save.
| Key | What to do with it |
|---|---|
| Origin Certificate | Copy from Cloudflare to a notepad and save as “cert.pem” |
| Private Key | Copy from Cloudflare to a notepad and save as “private.key” |
Now in NPM, go to SSL Certificates > Add SSL Certificate > Custom
| Property | Value |
|---|---|
| Name | Give your certificate a name. For example “cloudflare origin server” |
| Certificate Key | Choose your private.key file |
| Certificate | Choose your cert.pem file |
| Intermediate Certificate | Leave blank |
Step 5: Set up Cloudflare DNS for NPM
No website setup is complete without proper HTTPS setup. Let’s create a subdomain so that it can point to our NPM instance.
Go into Cloudflare then click on DNS > Add Record
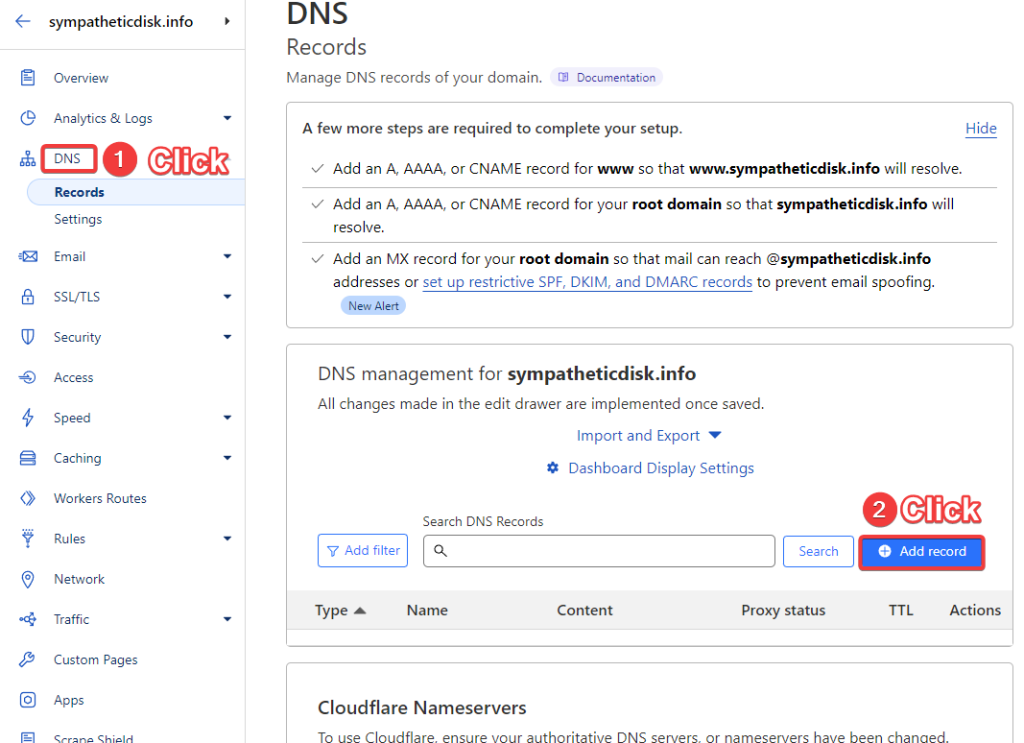
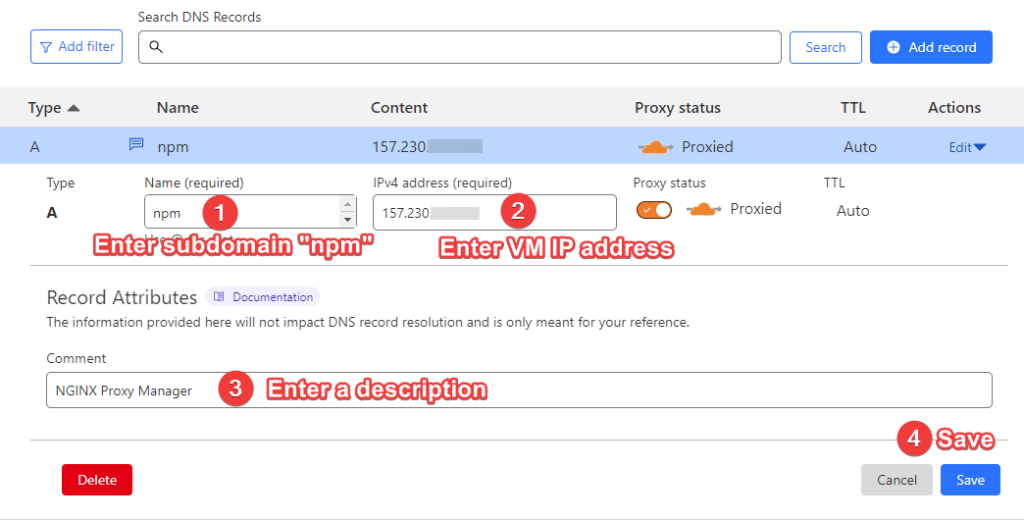
Fill out the record according to the following info.
| Property | Value |
|---|---|
| Type | A |
| Name | npm |
| IPv4 address | The IP to your Digital Ocean VM |
| Proxy Status | Proxied |
| Comment | Anything to help you remember that npm points to NGINX Proxy Manager |
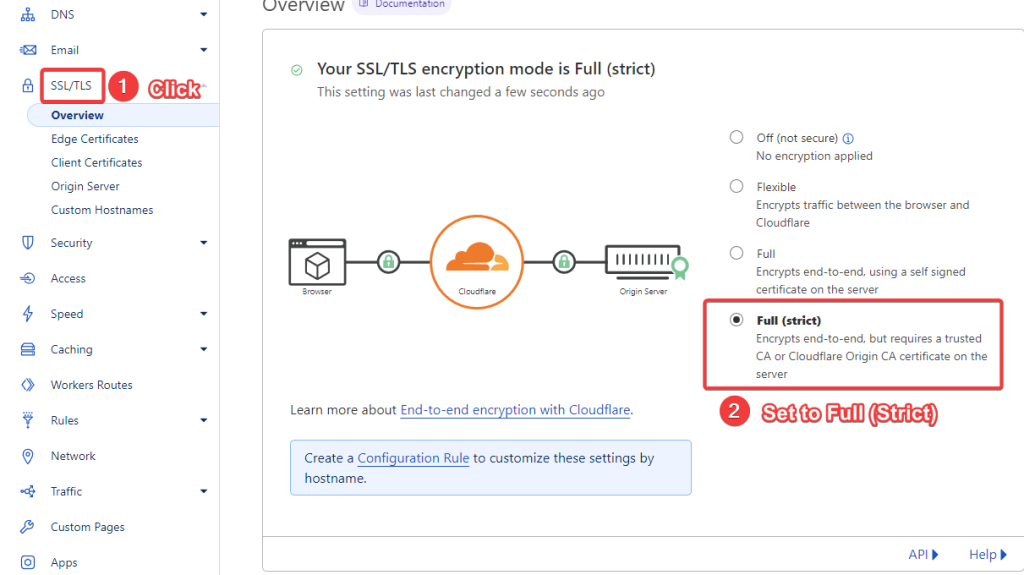
Lastly, let’s go to SSL/TLS and then switch the mode to Full (Strict). This will encrypt the entire connection from the clients to Cloudflare and then to your origin server.
Part 6: Set up NPM to proxy itself
This next part will set up NPM to proxy itself so that the NPM management site is under a subdomain with SSL.
Go back into NPM then click on Host > Proxy Hosts > Add Proxy Host.
| Property | Value |
|---|---|
| Domain Names | Enter your desired hostname as shown below. This should match the DNS entry in the previous step. |
| Forward Hostname / IP | This should match the container name that you entered into docker-compose.yml (line 3 on step 3, above) |
| Forward Port | This also comes from docker-compose.yml and tells NPM which port the Docker container has exposed. Set to 81, per the code snippet in step 3. |
| Block Common Exploits | On |
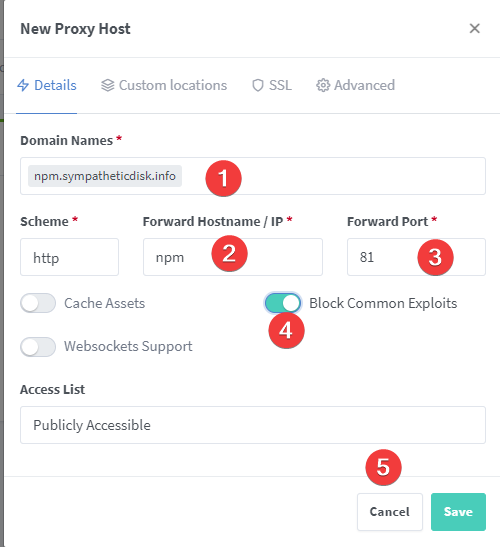
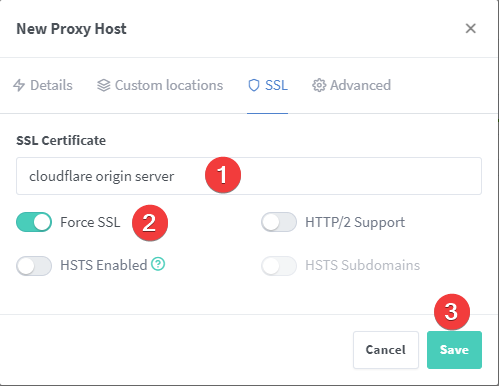
Switch to the SSL tab, select your SSL Certificate that you set up in step 4, turn on Force SSL then click save.
Now open a new browser tab and go to your hostname and voila! You now have NPM behind HTTPS.
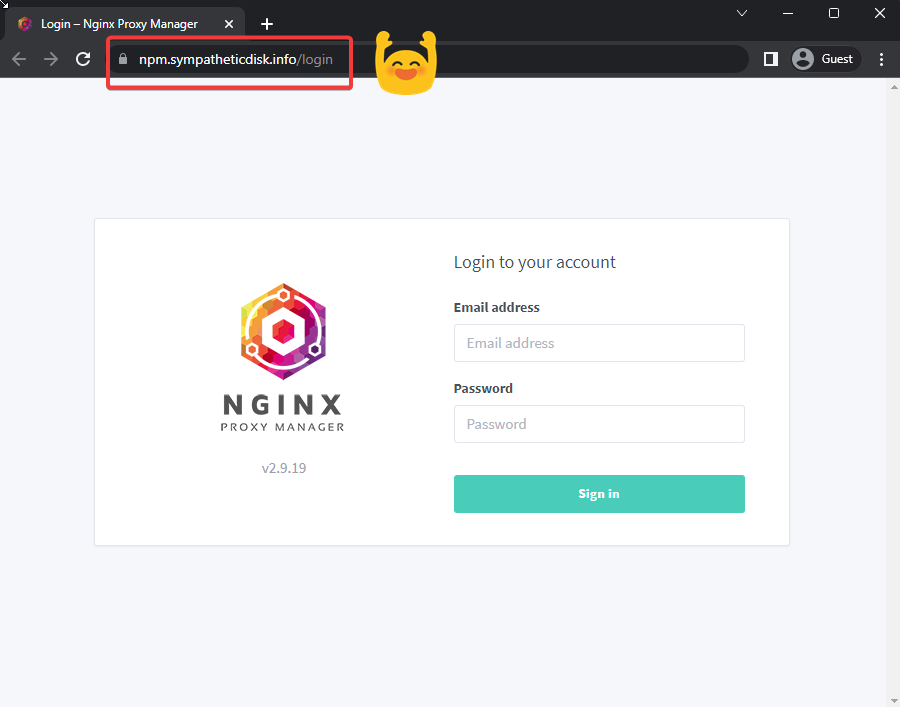
Now keep in mind that NPM is still available via the IP address so we need to fix that.
Step 7: Remove NPM container to host mapping
Go into VSC again and bring down the docker compose instance
docker compose down
Then edit docker-compose.yml to comment out the original 81:81 mapping and uncomment the expose property.
By doing so, host port 81 will not be directly tied to container port 81 which closes a security hole. Instead, NPM will be the only container that can proxy traffic through to itself on port 81. Then save the file and bring up the docker compose.
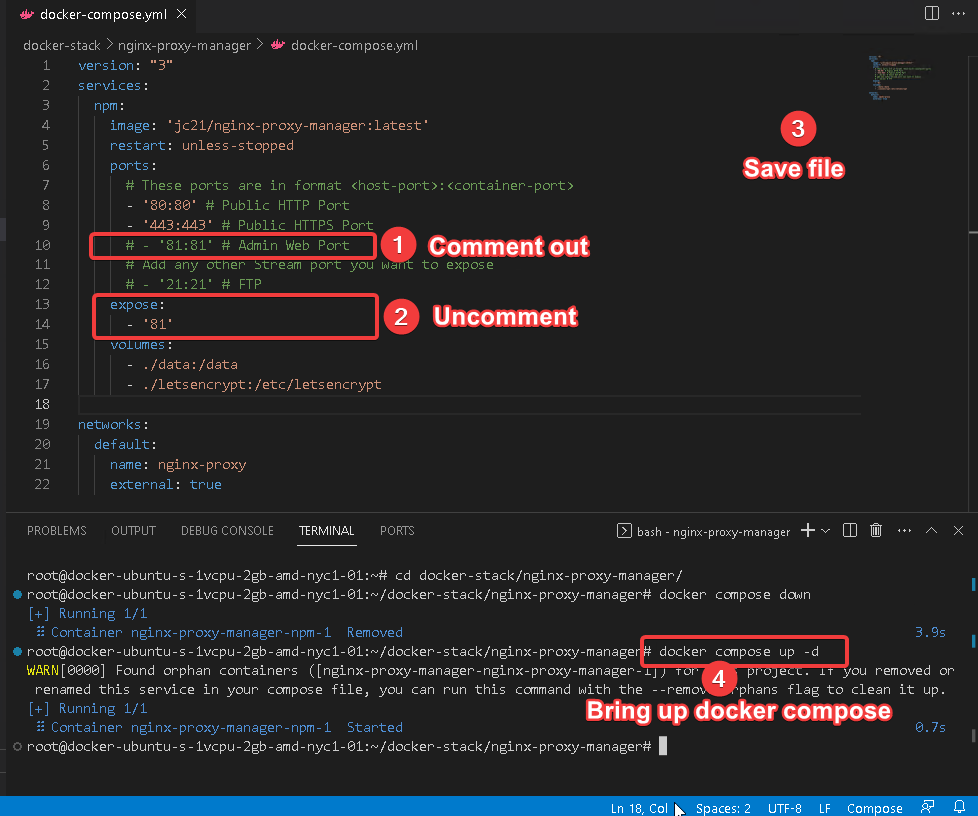
docker compose up -dYour docker-compose.yml should look like this
version: "3"
services:
  npm:
    image: 'jc21/nginx-proxy-manager:latest'
    restart: unless-stopped
    ports:
      # These ports are in format <host-port>:<container-port>
      - '80:80' # Public HTTP Port
      - '443:443' # Public HTTPS Port
      # - '81:81' # Admin Web Port
      # Add any other Stream port you want to expose
      # - '21:21' # FTP
    expose:
      - '81'
    volumes:
      - ./data:/data
      - ./letsencrypt:/etc/letsencrypt

networks:
  default:
    name: nginx-proxy
    external: true
That’s it! Now you have NPM proxying itself with SSL enabled. In a later guide, we will add Cloudflare Firewall rules so that we can limit who can access your NPM admin site.
You need to add a host entry in NPM that points to itself, then use a Let’s Encrypt Certificate or a Cloudflare Origin Server Certificate. Follow steps 6 and 7 above.
Continue with Part 6: How to set up multiple WordPress sites on Docker.