Anebula is reader-supported. When you buy through links on our site, we may earn an affiliate commission.
Documentation on this from a Docker Compose angle is sparse, so I wanted to share my stack that I’ve had running reliably for over a year. I run it on a Proxmox Virtual Machine, but your setup could differ so just keep in mind that this stack can run on any VM or bare metal setup.
Why should I run Home Assistant on Docker instead of via HA OS?
I went back and forth here initially, first with Docker, then HA OS, and then back to Docker. I started with Docker because that’s my preferred method to run services on my servers, but early on I began to wonder if HA OS had features I was missing out on, so I made the jump to HA OS. Then with HA OS I started to run into issues with Zigbee/Z-Wave devices disconnecting and troubleshooting wasn’t as straightforward as it was with Docker, so I made the jump back. I learned that my Docker setup was more reliable and that I wasn’t missing out on any features. On top of that, I could utilize the Docker troubleshooting skills that I had acquired over the years.
The stack consists of 7 containers:
Home Assistant – [required] This is the foundation of the stack and serves Home Assistant itself.
Mosquitto – [required] This is used by Zigbee2MQTT as a pub/sub event bus for devices. Zigbee2MQTT broadcasts events onto Mosquitto and Home Assistant is subscribed to those events.
Node-Red – [optional] This is an advanced automation platform for more intricate logic. I don’t use this as much now since Home Assistant improved in this area, but it’s still useful for handling advanced automation.
Zigbee2MQTT – [required] This is the bridge between the Zigbee USB dongle and Mosquitto. Zigbee2mqtt doesn’t communicate directly with HA, but rather through Mosquitto.
Zwave-JS-UI – [required] This is the bridge between the Z-Wave USB dongle and Home Assistant. This does communicate directly with Home Assistant and does not use Mosquitto.
InfluxDB – [optional] This is for long-term data storage outside of Home Assistant. Home Assistant sends events directly to InfluxDB via its built-in integration support. As a data nerd, I needed more reporting capabilities than Home Assistance offered, so I opted for InfluxDB + Grafana since this is the recommended upgrade. However, Home Assistant will store its own history whether you use InfluxDB + Grafana or not, so know that Home Assistant doesn’t care if you enable this.
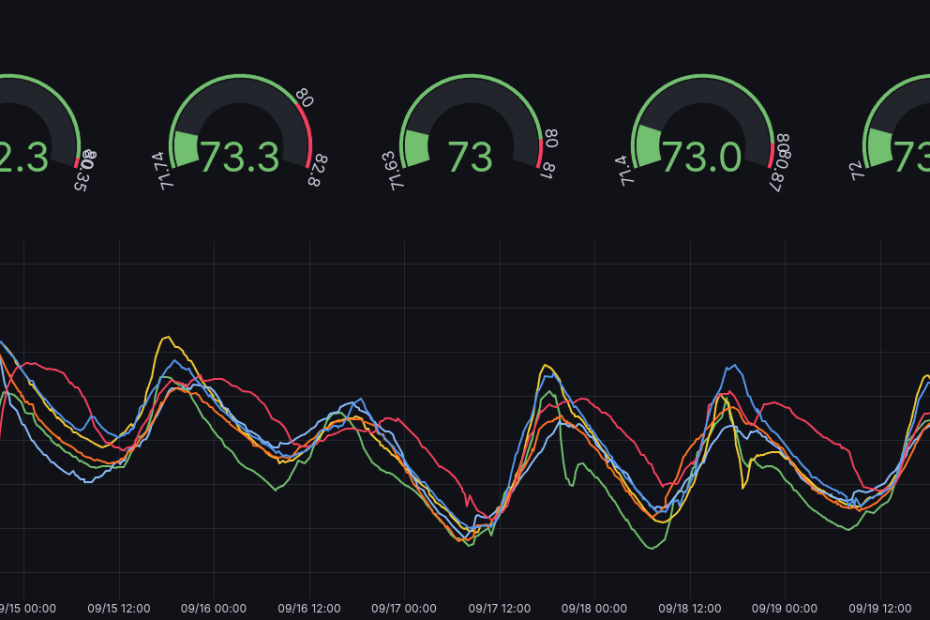
Grafana – [optional] This is the visualization layer on top of InfluxDB and gives far greater customization options.
services:
  homeassistant:
    container_name: homeassistant
    image: ghcr.io/home-assistant/home-assistant:stable
    environment:
      - TZ=America/Los_Angeles
    volumes:
      - home-assistant:/config
      - /etc/localtime:/etc/localtime:ro
    restart: unless-stopped
    # Try unprivileged:false first, I believe you only need to enable it if you have
    # device pass-through issues for this container. In my case, I delegate device control
    # to Zigbee2MQTT and Zwave-JS-UI, so homeassistant definitely did not need to be
    # privileged. Furthermore,  Zigbee2MQTT and Zwave-js-ui containers also work fine
    # without extra privilege.
    privileged: false
    network_mode: host

  mosquitto:
    container_name: mosquitto
    image: eclipse-mosquitto:latest
    restart: unless-stopped
    ports:
      - "1883:1883"
    command: "mosquitto -c /mosquitto-no-auth.conf"
    volumes:
      - mosquitto:/mosquitto/data

  node-red:
    container_name: nodered
    image: nodered/node-red:latest
    restart: unless-stopped
    environment:
      - TZ=America/Los_Angeles
    ports:
      - "1880:1880"
    volumes:
      - nodered:/data

  zigbee2mqtt:
    container_name: zigbee2mqtt
    restart: unless-stopped
    image: koenkk/zigbee2mqtt
    volumes:
      - zigbee2mqtt:/app/data
      - /run/udev:/run/udev:ro
    ports:
      - "8080:8080"
    environment:
      - TZ=America/Los_Angeles
    devices:
      - /dev/ttyUSB0:/dev/ttyUSB1

  zwave-js-ui:
    container_name: zwave-js-ui
    image: zwavejs/zwave-js-ui:latest
    restart: unless-stopped
    tty: true
    stop_signal: SIGINT
    environment:
      - SESSION_SECRET=ErJggHGhQW35jJ6g7H454447GWW
      - ZWAVEJS_EXTERNAL_CONFIG=/usr/src/app/store/.config-db
      # Uncomment if you want log times and dates to match your timezone instead of UTC
      # Available at https://en.wikipedia.org/wiki/List_of_tz_database_time_zones
      - TZ=America/Los_Angeles
    devices:
      # Do not use /dev/ttyUSBX serial devices, as those mappings can change over time.
      # Instead, use the /dev/serial/by-id/X serial device for your Z-Wave stick.
      - '/dev/serial/by-id/usb-Zooz_800_Z-Wave_Stick_533D054242-if00:/dev/zwave'
      # run this command: ls -l /dev/serial/by-id/*
    volumes:
      - zwavejsui:/usr/src/app/store
    ports:
      - "8091:8091" # port for web interface
      - "3000:3000" # port for Z-Wave JS websocket server


  influxdb:
    container_name: influxdb
    image: influxdb:2
    restart: unless-stopped
    volumes:
      - influxdb-data:/var/lib/influxdb2
      - influxdb-config:/etc/influxdb2
    environment:
      - name=value
      - DOCKER_INFLUXDB_INIT_MODE=setup
      - DOCKER_INFLUXDB_INIT_USERNAME=homeassistant
      - DOCKER_INFLUXDB_INIT_PASSWORD=yr6w4X8tvSQnyW3F
      - DOCKER_INFLUXDB_INIT_ORG=homeassistant
      - DOCKER_INFLUXDB_INIT_BUCKET=homeassistant
    ports:
      - "8086:8086"


  grafana:
    container_name: grafana
    image: grafana/grafana:latest
    restart: unless-stopped
    volumes:
      - grafana:/var/lib/grafana
    depends_on:
      - influxdb
    ports:
      - "3030:3000"

volumes:
  home-assistant:
  nodered:
  zigbee2mqtt:
  zwavejsui:
  mosquitto:
  influxdb-data:
  influxdb-config:
  grafana:
To put up your stack and view logs:
docker compose up -d && docker compose logs -f To manually update your stack – this will update all your images to the latest version available.
docker compose pull
docker compose up --force-recreate --build -d
docker image prune -f
Personally I update the stack automatically once a week via Watchtower, but keep in mind that this can cause issues if for example one container has breaking changes that aren’t handled automatically. I haven’t experienced any issues with automated updates, but I also have the peace of mind of using Proxmox restore in a pinch if I need to.
services:
  watchtower:
    image: containrrr/watchtower
    container_name: watchtower
    restart: unless-stopped
    environment:
      WATCHTOWER_SCHEDULE: "0 0 4 * * 3"
      TZ: America/Los_Angeles
      WATCHTOWER_CLEANUP: "true"
      WATCHTOWER_DEBUG: "false"
    volumes:
      - /var/run/docker.sock:/var/run/docker.sock

# runs at 4am on Wednesdays
Proxmox VM
You’ll need to download the Debian ISO debian-12.7.0-amd64-netinst.iso or find a different version depending on your hardware here.
| Base Operating System | Debian 12 Bookworm |
| Memory | 6.00 GB |
| BIOS | SeoBIOS |
| Display | Default |
| Machine | i440fx |
| SCSI Controller | VirtIO SCSI single |
| Hard Disk | discard=on,iothread=1,size=64G |
| Network Device | VirtIO (paravirtualized) |
| USB Device | Select your Zwave USB |
| USB Device | Select your Zigbee USB |
Additional Steps
- Before putting up the stack, you must map your Z-Wave and Zigbee device locations to line 52 and line 69 of the Docker compose file. Look up the documentation for Zigbee2MQTT and Zwave-JS-UI to find these for your OS.
- For Zigbee, I recommend the SONOFF Zigbee 3.0 USB Dongle. I’ve been running one for over 2 years without any issues.
- For Z-Wave, I recommend the Zooz 800 Series ZST39 . I’ve been running the 800 series for a few months now and before that, I was using the older Zooz 700 series USB dongle for over a year without any problems.
- For both dongles above and any Zigbee or Z-Wave dongle in general, it is always recommended to use a USB extension cable so that the dongles are separated from the server to minimize interference. I use these ITD ITANDA 10FT USB 3.0 Extension Cables, you’ll need two cables, one for each dongle.
- When you put up the stack for the first time, you’ll need to go through the Home Assistant, Zigbee2Mqtt, Zwave-JS-UI, Nodered, InfluxDB, and Grafana configuration so that they all talk to each other. I would go in this order:
- Set up Home Assistant (http://serverip:8123) and add the MQTT integration (Settings > Devices and Services > Add Integration > MQTT. Broker:
localhostand Port:1883 - Mosquitto doesn’t need any configuration whatsoever so you don’t need to do anything once the container is up.
- Set up Zigbee2MQTT (http://serverip:8080). It should auto-recognize your dongle and from there you can enable “Permit Join (All)” to start adding Zigbee devices. Adding devices via Zigbee2MQTT should auto-register with Home Assistant since HA is monitoring Mosquitto for events and thus there is no extra integration or setup needed in HA other than setting up MQTT.
- Set up ZWave-JS-UI (http://serverip:8091). See minimum settings here.
- Set up Z-Wave-JS integration in Home Assistant. Unlike Zigbee2MQTT, ZWave-JS-UI does have a dedicated integration in HA. Enable the integration via Settings > Devices and Services > Add Integration > Z-Wave. URL:
ws://localhost:3000 - [Optional] Set up Nodered, I won’t cover this, but the docker compose will start up the service.
- [Optional] Set up InfluxDB, raising the stack does 95% of the work except for creating an API token that HA can use. So go into InfluxDB (http://serverip:8086), Load Data > API Tokens, and generate an API Token for All Access and give it a name like “homeassistant”.
- [Optional] Set up Grafana (http://serverip:3030), and add a data source for InfluxDB.
- URL: http://serverip:8086
- Skip TLS Verify: enable
- Database: homeassistant
- User: homeassistant
- Password: Same password that you chose in line 89 of docker-compose.yml
- [Optional] Set up Home Assistant to send data to InfluxDB. There are a few steps here, so see the more detailed section below.
- Set up Home Assistant (http://serverip:8123) and add the MQTT integration (Settings > Devices and Services > Add Integration > MQTT. Broker:
Setting up Home Assistant to send data to InfluxDB
Currently, you need to set up the Home Assistant integration with InfluxDB via the configurations.yaml file as there is no user-friendly GUI method to achieve this.
docker exec -it homeassistant /bin/bash
apk add nano
nano configurations.yaml
Add an influxdb section. See Home Assistant documentation for more info. I’m using the generic one that is below that came from the Home Assistant documentation. Save, close, then restart Home Assistant container.
Line 5 should be the IP of the server that it is running on. Ex: 192.168.1.50
Line 7 should be the API Token that you created in InfluxDB.
...
influxdb:
  api_version: 2
  ssl: false
  host: <serverip>
  port: 8086
  token: <influxdb token>
  organization: homeassistant
  bucket: homeassistant
  tags:
    source: HA
  tags_attributes:
    - friendly_name
  default_measurement: units
  exclude:
    entities:
      - zone.home
    domains:
      - persistent_notification
      - person
  include:
    domains:
      - sensor
      - binary_sensor
      - sun
    entities:
      - weather.home
...
That should be it. Post a comment if you run into any issues.
Thank you so much for your basic Docker Compose stack for Home Assistant with integrations. Works perfectly!
Jim